|
Shoulder overuse injuries are very common within the swimmer population whether it be high school, college or masters level participation. A study published in 1995 reveals that 47% of collegiate swimmers and 48% of masters swimmers report experiencing shoulder pain lasting 3 weeks or more.[1] More recently, studies have shown as high as 91% of swimmers aged 13-25 reporting shoulder pain, 84% of those had positive impingement signs, and 69% of those studied with MRI had supraspinatus tendinopathy.[2] One adaptation seen with swimmers experiencing shoulder pain is a decrease in active upward rotation of the scapula with shoulder elevation following a fatiguing bout of swimming.[3] Possible causes for this adaptation can be tonic or shortened levator scapula, weakness of serratus anterior, immobile and kyphotic thoracic spine, weak or fatigued infraspinatus, and adaptively shortened pectoralis minor. Other possible factors contributing to impingement symptoms or overuse tendinosis among swimmers include strength imbalances between subscapularis and infraspinatus, and activation imbalances between upper trap and lower trapezius. In an effort to maintain healthy shoulders in swimmers, it is important to remember that the shoulder girdle articulates with the rib cage and, therefore, the rest of the trunk. So the posture and dynamic control of the trunk can influence how well the shoulder functions. The classic standing “swimmer posture” is characterized as a head forward posture, rounded shoulders, increased lumbar lordosis, genu recurvatim (hyperextended knees), kyphotic thoracic spine (rounded upper back), and flared lower ribs. This posture can lead to poor abdominal and gluteal activation, not to mention altered breathing efficiency and dysfunctional shoulder mechanics. When the shoulders are rolled forward, the shoulder socket is angled downward and the muscles that stabilize the shoulder "ball" in the "socket" (rotator cuff muscles) have to work much harder. The rotator cuff is susceptible to fatigue due to the sheer number of revolutions that occur with a typical swim workout, no need to overload those same muscles with faulty posture. When attempting to strengthen the scapular retractors and depressors, a common compensation for a stiff thoracic spine and poor mid/lower trapezius activation is to further extend the lumbar spine. If a swimmer is only able to retract or depress the scapulae by extending the lumbar spine, this has adverse consequences in the water. When swimming, the hips will drop, the abdominal muscles will be harder to recruit; making the body position less hydrodynamic and the trunk a less stable base for propulsion. Here are some examples of exercises to address some of those typical areas of tightness, immobility or weakness associated with the classic "swimmer posture". This content is for informational purposes only and does not constitute medical advice; the Content is not intended to be a substitute for professional medical advice, diagnosis, or treatment. Always seek the advice of a physician or other qualified health provider with any questions you may have regarding a medical condition. Never disregard professional medical advice or delay in seeking it because of something you have read on this website. Thoracic Extension Self-Mobilization Purpose: increase mobility of thoracic spine, decrease kyphotic postures Instructions: Lie on back with knees bent and foam roller behind mid back with foam roller perpendicular to spine. Support neck by clasping hands behind neck with elbows straight forward. Stretch upper back into extension over roll by reaching elbows upward. Pressure on, pressure off. 3-4 reps in 2-3 different positions along mid back. NOTE: Important to keep pelvis tucked under with abs activated in order to avoid excessive lumbar extension. Pectoralis Stretch on Foam Roller Purpose: Stretch pectorals, facilitate posterior pelvic tilt and normalize lumbar extensor tone, increases abdominal activation Instructions: Lie on back on foam roller with knees bent and flat on floor. Inhale with arms in front of face with elbows bent. Exhale, tucking pelvis under and closing ribs as you bring arms into "goal post" position. Inhale to start position. Quadruped Belly Lift with Upper Extremity March Purpose: Facilitate posterior pelvic tilt, activate abdominals with rotational stabilization, close down the ribs to allow diaphragm to relax and normalize psoas tone, and activation of serratus anterior Instructions: Start on hands and knees. Inhale. Exhale and tuck pelvis. Inhale holding tuck. Exhale lift knees and tuck further. Inhale, holding tuck. Exhale, tuck further and lift R hand without twisting or leaning. Inhale and lower hand. Alternate hands. Supine Scapular Overhead Press with Tubing Purpose: Re-educate and strengthen the serratus anterior without thoracic compensations for optimal upward scapular rotation. Instructions: Lie on back with knees bent and feet flat. Tubing wrapped around back with an end in each hand. With arms straight and arms angled slightly upward toward head. Keep pelvis tucked under and press shoulders away from floor and slowly return to start. Prone Scapular Combo on Stability Ball with Posterior Pelvic Tilt Purpose: Facilitate posterior pelvic tilt and abdominal recruitment, facilitate lower trapezius activation without over-activation of upper trapezius, and strengthen infraspinatus. Instructions: Prone over stability ball with body in a plank position Tuck pelvis under and engage abs, "pressing pubic bone into ball". Start with arms at side with palms in. Squeeze blades down and back. Keep blades down and back as you bring arms to a "T" with thumbs pointed up. Then bring arms to a wide "Y" with thumbs up. Back to the "T" and then back to side. Don't let low back arch. Actively press shoulder blades downward toward hips through the movement. Can also bring knees to floor if having difficulty maintaining posterior pelvic tilt. Self Myofascial Release Purpose: decrease pain and improve mobility of soft tissue to scapular and rotator cuff musculature to facilitate normal scapular mechanics. 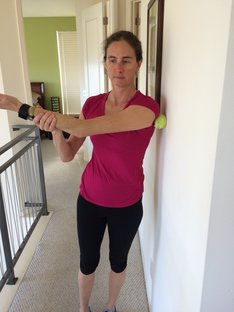 Posterior Rotator Cuff Instructions: Stand with tennis ball pressed between back side of shoulder blade and wall. Find tender or tight spot, pin it with the tennis ball and then passively or actively move the involved arm (upward or across chest) until muscles relax. 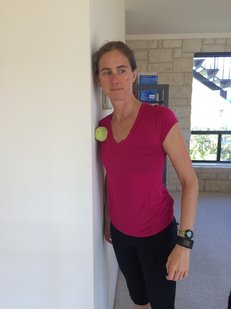 Pectorals Instructions: Facing a doorframe, place tennis ball between pectoralis muscle and doorframe with arm in “cactus position” or at side. Slowly turn sternum away from ball until feel stretch in chest. 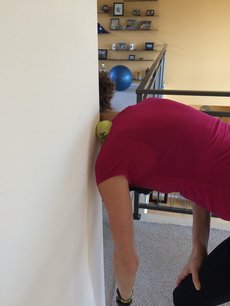 Upper Trapezius/ Levator Scapula Instructions: In door frame, place ball between doorframe and upper trapezius. Pin the tight areas and gently move neck until you feel muscles relax. References [1] Stocker D, Pink M, Jobe FW. (1995). Comparison of shoulder injury in collegiate- and master’s-level swimmers. Clin J Sport Med 5 (1): 4-8.
[2] Sein ML, Walton J, Linklater J, Appleyard R, Kirkbride B, Kuah D, Murrell GAC. (2010). Shoulder Pain in elite swimmers: primarily due to swim-volume-induced supraspinatus tendinopathy. Br J Sports Med 44(2): 105-13. doi: 10.1136/bjsm.2008.047282 [3] Su KP, Johnson MP, Gracely EJ, Karduna AR. (2004). Scapular rotation in swimmers with and without impingement syndrome: practice effects. Med Sci Sports Exerc 36(7): 1117-23.
2 Comments
Who knew that something that comes so naturally can be used to help so many things such as your heart, brain, digestive system, immune system, and even improve your posture! I just came across an old episode of Morning Edition on NPR from 2010, in which a Harvard researcher, Herbert Benson, had research showing that breathing could affect gene expression.
The article he was referring to is titled “Relaxation Response Induces Temporal Transcriptome Changes in Energy Metabolism, Insulin Secretion and Inflammatory Pathways”. Now, I would never claim to understand anything about genome research and transcriptional profiling, but I found it an interesting read. My only knowledge on this subject probably comes from watching Law and Order and from living through the O.J. trial. (if you are not old enough to have ever seen a pay phone, there once was this famous football player…..oh never mind, look it up; I think there was a documentary about it at SXSW). The article explains that the “relaxation response” (RR) is a state that is the exact opposite of our “fight-or-flight” response. This state can be achieved in a number of ways: focusing on breathing, a word, phrase, sound, repetitive prayer or movement and disregarding everyday thoughts. This technique is a part of many different mind-body approaches such as meditation, yoga, Tai Chi, Qi Gong, progressive relaxation, and biofeedback. In this study, the researchers worked with both experienced relaxation practitioners and novice practitioners before and after receiving 8 weeks of relaxation training. The researchers looked at changes in genomic expression during a single session of RR. The specifics of the data collection and statistical analysis are beyond my pay grade, so fast-forward to the discussion. The researchers found changes in gene expression with both the experienced and the trained novices after a single RR session. The genes involved are those responsible for processes in the body that affect how our body produces energy and how our cells age. What was the intervention that the researchers used to cause this effect? The longterm practitioners reported regular practice of some sort of RR-inducing technique including several forms of meditation, Yoga, or repetitive prayer; so they just kept doing what they usually do. The novices had a weekly session where they were guided through an RR-inducing sequence: diaphragmatic breathing, body scan, mantra repetition, and mindfulness meditation. They also received a 20-minute audio CD that guided them through this same sequence once a day at home. Diaphragmatic breathing: 1. Lie on your back on rug or blanket on the floor in “dead man’s pose” with your legs straight and slightly apart, arms at your side but not touching your body, palms up and eyes closed 2. Bring your attention to your breathing. Take note of the depth of your breath, if you are breathing more into the chest or your abdomen. 3. Place one hand on your chest and the other on your abdomen. Breathe through your nose. Spend a minute or two breathing into your abdomen and letting your chest follow the movement of your abdomen. Body scan: As you continue the diaphragmatic breathing, systematically scan your body for tension. Start at the top of your head and move down from there, relaxing your face, your jaw, your throat, and your neck. Then progress to shoulders, arms, hands, chest, stomach, back, hips, legs and feet. You can imagine that your body is like a wick and every inhale draws a warm liquid (or cold liquid if it is mid-August in Austin) in through the top of your head. Every exhale pulls the liquid further down your body, breath-by-breath relaxing each part of your body and imagining each part feeling saturated and heavy. Mantra repetition: Mantra is a syllable, word or name that is repeated many times as you free your mind of thoughts. You can choose any word that has meaning for you “peace”, “love”, “calm”, or whatever holds meaning for you. Once you are settled into a quiet state, you chant the mantra aloud (but not so loud that it strains your voice). Focus on your word as you rhythmically speak it in a relaxed manner. You can then shift from chanting aloud to whispering it, relaxing even deeper. Mindfulness meditation: Sitting or lying quietly with eyes closed. Listen to the sounds around you. Give equal attention to each of them, no one sound being more significant than the other. Do not analyze or focus on any one sound. 1. say to yourself, “I am aware of all the sounds that surround me” 2. start this practice in a quieter location, but progress to louder, more crowded locations 3. once you are practiced at being aware of the sounds around you without focusing your attention on any one sound, then progress to allowing your thoughts to surface and listen to them without forcing them, analyzing them, or judging them. Observe them objectively without being influenced by them. Say to yourself, “I am aware of my thoughts, my perceptions of my environment and my body and my feelings. In this moment and this place I am experiencing these things. I have my own life and I am experiencing it right now”. 4. You can experience these thoughts from a relaxed, alert, impartial position. Twenty minutes a day and within 8 weeks, we can all make a positive impact on our brains and our bodies! Are you dealing with pain or injury? Learning these techniques are also an important aspect of teaching your brain not to "catastrophize" your pain experience and worsen your pain. Check out this book, The Opioid-Free Pain Relief Kit: 10 Simple Steps to Ease Your Pain by Beth Darnall, PhD. Order here on Amazon. References: Bhasin MK, Dusek JA, Chang B-H, Joseph MG, Denninger JW, et al. (2013) Relaxation Response Induces Temporal Transcriptome Changes in Energy Metabolism, Insulin Secretion and Inflammatory Pathways. PLoS ONE 8(5): e62817. doi:10.1371/journal.pone.0062817 Davis M, McKay M, Eshelman E (1982) The Relaxation & Stress Reduction Workbook. Oakland, CA: New Harbinger Publications. |
AuthorKendal Jacobson, PT Archives
January 2023
Categories |
 RSS Feed